Step-by-step guide on how to apply permanent tire stickers

Step-by-step guide on how to apply permanent tire stickers
Permanent Tire stickers on your vehicle's tires are the key to giving your car a professional, branded appearance. But how do you get them to adhere to the rubber? It's rather simple, and our kits include everything you need to get started.
Below we have discussed everything you need to know about applying tire stickers. So, read on to find out.
Wear latex gloves to protect your hands.
These guards against dirt, grease, adhesives, and chemicals. Wear gloves during the application procedure.
Gloves, tire decals and glue are often included in permanent tire sticker packages.
At THE BELGIAN BROTHERS, you can get the greatest permanent tire sticker kits.
Using acetone and a clean towel, scrub the tire sidewalls clean.
Place the cloth over the top of an acetone container and tilt it over for a few seconds to get some acetone on the rag. Wipe off all of the sidewall surfaces with a clean section of the cloth and extra acetone as needed. It's clean when the towel stops becoming filthy while wiping off the rubber. Depending on how filthy the tire sidewalls are, you may need to wipe them down ten times or even more.
Use acetone to clean the back of each decal.
Apply some acetone to a clean cloth. To remove any impurities, gently clean the back of each decal you want to apply. To keep the backsides clean, place the decals face down on a clean surface after wiping them with acetone.
Apply a uniform coating of glue to the back of each decal
Squeeze a medium-sized bead from the nozzle of the sticky tube, following the shape of each word or shape on the decal. Spread the glue evenly on the back of each letter or form using the tip of the nozzle.
If your decals are longer than 3-4 letters, use adhesive to just approximately half of the decal at first to guarantee optimal bonding. If you apply a thick layer of glue, it will ooze out from the edges when you attach the decals.
Apply pressure to the sticker for 30 seconds after applying
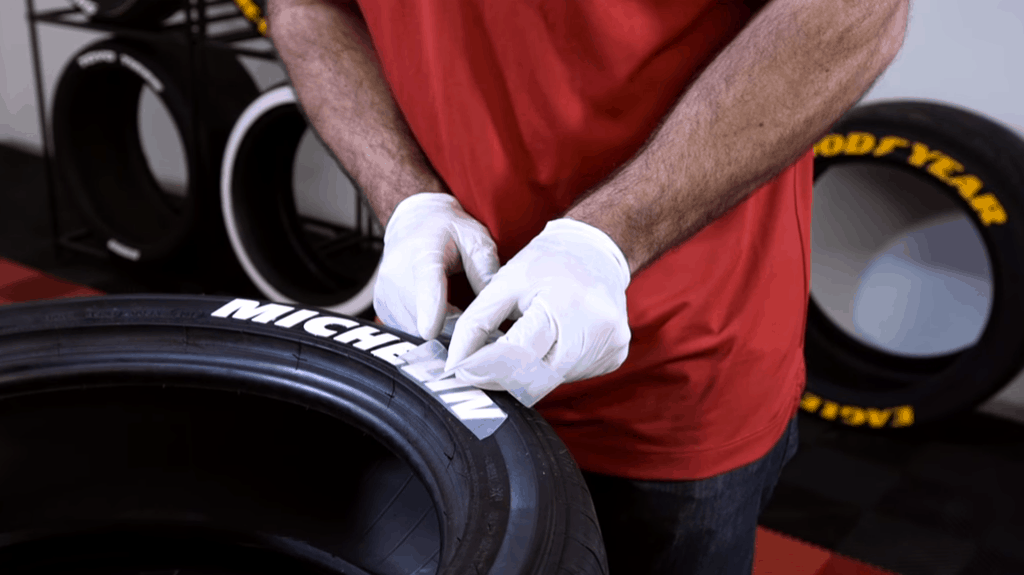
Place the decal on the tire sidewall and secure it. For 30 seconds, press down on the letters with both hands to secure the sticker to the tire.
If you only applied glue to half of the decal, go ahead and repeat the procedure and push the other half into place as well. Use Tire Stickers
After 10 minutes, remove the transfer film.
Allow 10 minutes for the glue to cure on the tires and decals. Peel the transfer film off the front of the decals gently and carefully and discard it.
Smooth out any air bubbles or places that don't seem to be entirely bonded by applying gentle pressure from the center outward towards the borders of the decals.
Apply extra glue and pressure to any unsealed edges.
Examine all of the edges of the decals for any that are pulling up. To seal the decals, squeeze a little quantity of glue beneath any elevated edges and push them down onto the tire for 30 seconds.
If you accidentally squeeze out too much glue, wipe it away with the included touch-up cleaner or acetone and a clean towel.
Allow the decals to cure for 1-2 hours before driving or washing
This allows the glue to completely cure and ensures that the decals adhere properly. After about an hour or two, you may drive and wash your vehicle normally. When washing and detailing your automobile, avoid using oil-based tire shines. They have the potential to destroy the decals.
If you ever need to remove permanent tire stickers, use pliers to scrape them off. Remove any residual glue with acetone and gently sand the tire sidewall.
Takeaway
Everything starts with the tires if you want to give your automobile a fresh appearance. Tire Letters offers personalized permanent tire stickers for autos. We have every size and color available to meet your specifications. So, please do not hesitate to contact us, and we will assist you.


